Task Details, Work Logs & Blockers
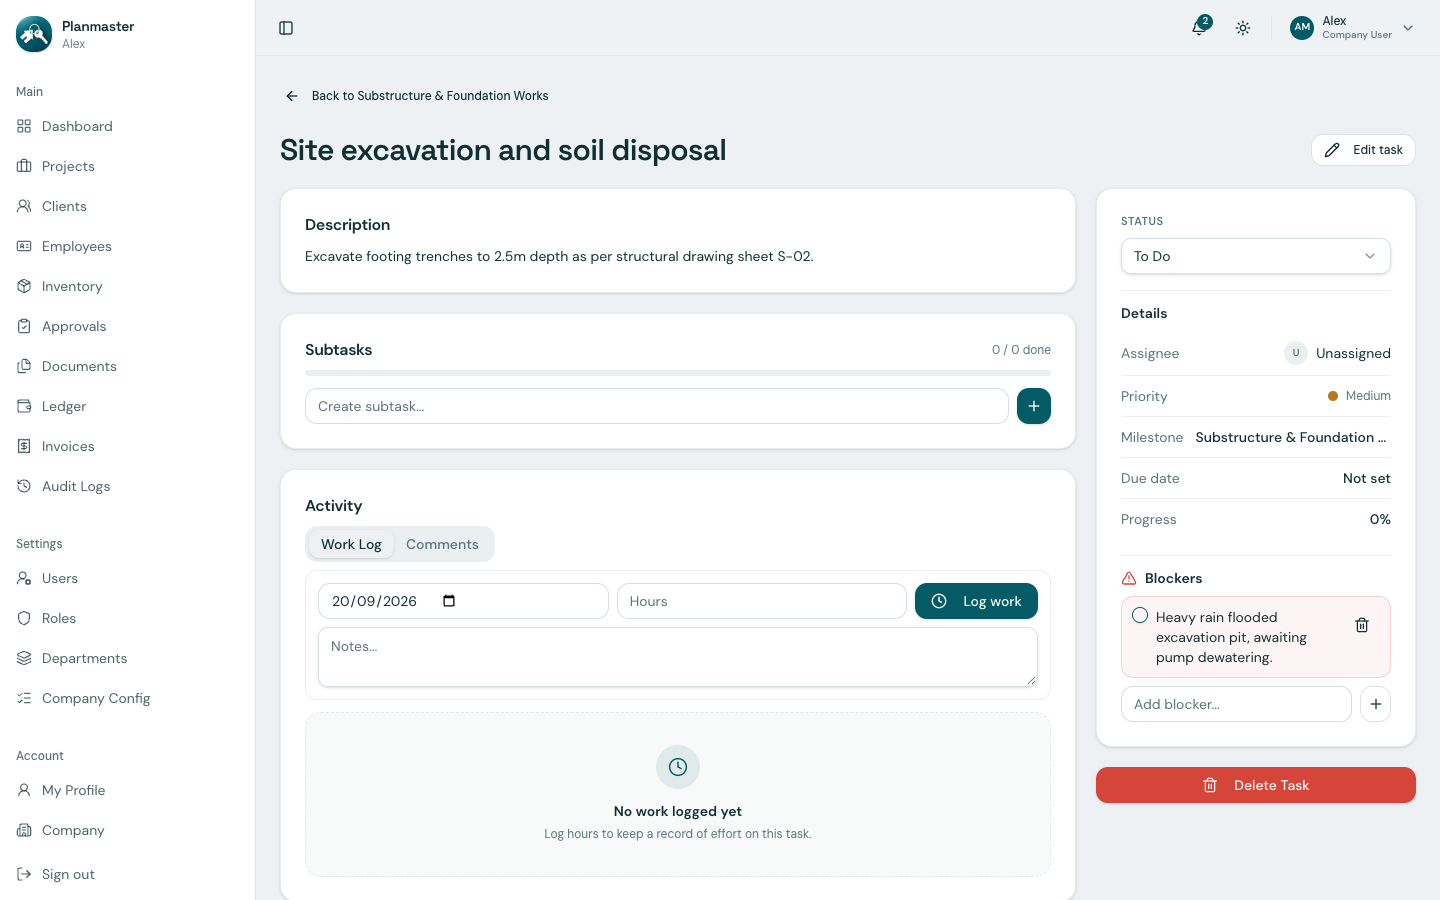
Every task in Planmaster has its own dedicated workspace (/tasks/:id). This screen serves as the collaboration hub for site supervisors, engineers, and project managers working on a specific job item.
What is Inside a Task?
When you click on any task title, Planmaster displays four functional zones:
- Header & Metadata: Status dropdown, Priority level, Assignee, and Due date (Start date is set via Edit task).
- Subtasks Checklist: Step-by-step checklist to ensure quality standard operating procedures (SOPs) are followed before marking the task complete.
- Work Log (Timesheet): Daily record of hours spent and site labor notes.
- Blockers & Issues: Dedicated issue tracker to flag external impediments holding up site progress.
- Team Comments: Collaborative discussion feed for site engineers, architects, and managers.
Step 1: Managing Status & Priority
At the top of the task details page, you can update execution state with a single click:
- Status Dropdown:
To Do: Scheduled work not yet initiated.In Progress: Crew is currently mobilized on site.Blocked: Work has stopped due to an active site blocker (see Step 4).Done: Inspected, approved, and formally closed.- Priority: Mark tasks as
Low,Medium, orHighso field supervisors know what to focus on during morning standup briefings. Priority and Start date are set from the Edit task dialog.
Step 2: Breaking Down Work with Subtasks
Big tasks often involve multiple quality checks. With Subtasks, you create a simple checklist:
- In the Subtasks section, type an action item into the text field (for example: Check soil compaction density or Verify rebar spacing per drawing C-102).
- Press Add (or press Enter).
- As work is inspected on site, click the checkbox next to the subtask.
- Planmaster shows a progress indicator (e.g.,
2/3 completed).
Step 3: Logging Hours in the Work Log (Timesheet)
To keep track of engineering hours and labor efficiency:
- In the Work Log card, enter:
- Hours Spent: Number of hours worked on this task (e.g.,
4.5). - Work Description: Notes on activities completed (e.g., Excavated 45 linear meters of foundation trench).
- Date: Date the work was performed.
- Click Log Work.
The hours are saved with your name and timestamp, building a verifiable timesheet for project tracking.
Step 4: Flagging & Resolving Site Blockers
When work on site cannot proceed due to external factors (such as delayed drawings, unseasonal rainfall, or missing material shipments):
How to Log a Blocker:
- In the Blockers section, type the reason in the text box (e.g., Heavy rain flooded excavation pit, awaiting pump dewatering).
- Click Add Blocker.
- Instant Visibility: A red alert badge immediately appears on the task, on the project overview, and on the company home dashboard under Active Blockers.
How to Resolve a Blocker:
- Once the problem is solved (e.g., the water pump arrives and dries the trench), open the task.
- Check the Resolve checkbox next to the active blocker.
- Planmaster marks the blocker as resolved, records the resolution timestamp, and clears the alert from your company dashboard.
Step 5: Team Collaboration Comments
Need to ask the project manager for a specification clarification or notify a colleague about site conditions? - Type a note in the Comments box and click Post Comment. - All remarks are saved chronologically with the author's name and timestamp, keeping all project communication in one central place.